Author:Bill

WordPress User Activity Email

wordpress user activity email

If you happen to be a WordPress admin you’d like to get up to date information about user activity on your website. There are a few options. You can use a plugin such as Activity Log, or plenty others available at the plugin repository. However, if you use the Activity Log plugin, for instance, you have to log in and scroll through the log to find out what has happened. The other option is to get a WordPress user activity email at your convenience.

I wanted a daily email sent to my admin email address, listing the activity since the day before. Instead of using a WordPress plugin I decided to write some PHP code and do this on my own. The site I developed this for is a “private site” where only registered and logged in users have access to contents. It made me feel better to have full control over this functionality.

Let’s Get User Activity Data

The first thing we need is a function to capture the last login time for the current user and store this time as user meta data. I also decided to capture the user IP during login. We get to that function later. The update_last_user_login($user_login, $user) function is called using add_action() with the wp_login hook. Now every time a user logs in the according meta data user_ip_login gets updated.

function update_last_user_login($user_login, $user)
{
    update_user_meta($user->ID, 'last_login', time());
    update_user_meta($user->ID, 'user_ip_login', get_user_ip());
}
add_action('wp_login', 'update_last_user_login', 10, 2);

Next we need a function to log user activity. Some users stay logged in and the user login hook will not fire when a logged in user returns to the site. Conveniently, we use the wp_footer hook. It fires every time a page is loaded. Sneakingly we log the user IP as well.

function update_last_user_activity()
{
    if (is_user_logged_in()) {
        update_user_meta(get_current_user_id(), 'last_active', time());
        update_user_meta(get_current_user_id(), 'user_ip_active', get_user_ip());
    }
}
add_action('wp_footer', 'update_last_user_activity');

With these two actions we saved all the information we need for our WordPress user activity email. Of course, using user meta to save this information will not provide us with a history of user activity. That would require an additional database table to keep. I may work on that in the future.

Where is the user coming from?

As mentioned before, we also retrieve the user’s IP address and save it in a separate user meta field. To get the IP address we use the PHP $_SERVER super global which holds information about headers, paths, etc. in array form. Detailed information about the $_SERVER variable can be found here. The get_user_ip() function checks several different indices of the $_SERVER array because the usage of $_SERVER is not always consistent. It is known that these addresses can be either empty or even forged, so be aware. However, it’s still better than a sharp stick in the eye.

function get_user_ip()
{
    if (!empty($_SERVER['HTTP_CLIENT_IP'])) {
        $ip = $_SERVER['HTTP_CLIENT_IP'];
    } elseif (!empty($_SERVER['HTTP_X_FORWARDED_FOR'])) {
        $ip = $_SERVER['HTTP_X_FORWARDED_FOR'];
    } else {
        $ip = $_SERVER['REMOTE_ADDR'];
    }
    return $ip;
}

Since I’m kind of a sleuth, I also want to know the geolocation of the IP address. get_geolocation($ip) uses the freely available http://ip-api.com/json/ API to get detailed information about where the IP is located and returns it in JSON format.

For instance, if we call the API with http://ip-api.com/json/142.250.138.139, which is Google’s IP address, we’ll get the following information:

{
    "status": "success",
    "country": "United States",
    "countryCode": "US",
    "region": "CA",
    "regionName": "California",
    "city": "Mountain View",
    "zip": "94043",
    "lat": 37.422,
    "lon": -122.084,
    "timezone": "America/Los_Angeles",
    "isp": "Google LLC",
    "org": "Google LLC",
    "as": "AS15169 Google LLC",
    "query": "142.250.138.139"
}

The get_geolocation() function uses the IP address stored as user meta and formats the return as a string to be used by the email function. The API return is a raw JSON string. Here we use the json_decode() function to convert the geolocation data into an associative array.

function get_geolocation($ip)
{
    $url = 'http://ip-api.com/json/' . $ip;
    $geolocation = json_decode(file_get_contents($url), true);
    $email_content = '';
    if ($geolocation['status'] == 'success') {
        $email_content .=
            $geolocation['query'] . '</br>'
            . $geolocation['countryCode'] . ' '
            . $geolocation['city'] . ', '
            . $geolocation['region'] . ' '
            . $geolocation['zip'] . ' - '
            . $geolocation['isp'];
    } else {
        $email_content .= 'No geolocation available: ' . $geolocation['message'] . '!';
    }
    return $email_content;
}

Let’s make an Activity Table

Now we have all the data we need to put together the results in a nicely formatted HTML table. The function get_activity_list() iterates through all users, in our case users with a certain role, and creates a table row for each login and each activity. I decided that I only want to see the activity for the last day. The ternary operator containing ($last_active >= strtotime("-1 day") singles these out.

function get_activity_list()
{
    $blogusers = get_users(array('role__in' => array('author', 'administrator')));
    $email_content = '';
    foreach ($blogusers as $user) {
        $last_login = get_user_meta($user->ID, 'last_login', true);
        $last_active = get_user_meta($user->ID, 'last_active', true);
        $login = (!empty($last_login) && ($last_login >= strtotime("-1 day"))) ? true : false;
        $active = (!empty($last_active) && ($last_active >= strtotime("-1 day"))) ? true : false;
        if ($login || $active) {
            $email_content .= '<tr><td rowspan="2" class="name-row">' . $user->display_name . '</td>';
            if ($login) {
                $user_ip_login = get_user_meta($user->ID, 'user_ip_login', true);
                $email_content .= '<td>login</td><td>' . date('M j, Y, g:i a', $last_login) . '</td><td class="small-font">' . get_geolocation($user_ip_login) . '</td></tr>';
            } else if ($active) {
                $email_content .= '<td>no login</td><td></td><td></td></tr>';
            }
            if ($active) {
                $user_ip_active = get_user_meta($user->ID, 'user_ip_active', true);
                $email_content .= '<td>active</td><td>' . date('M j, Y, g:i a', $last_active) . '</td><td class="small-font">' . get_geolocation($user_ip_active) . '</td></tr>';
            } else if ($login) {
                $email_content .= '<td>no activity</td><td></td><td></td></tr>';
            }
        }
    }
    return $email_content;
}

The HTML User Activity Email

Last but not least we need to assemble an email and send it. As mentioned before we want to send an HTML email because we want the data formatted as an HTML table. The function send_user_activity_email() puts all this together. First, the email headers need to be set to ensure a smooth HTML transmission. If you’re interested, or if you want to ruin your day, details about email headers can be found in RFC 2045.

The email content is a HTML document. But unfortunately most email hosts and clients don’t understand all HTML tags. The safest way to format an HTML email is to use tables. We start with the HTML <head> containing the styling for our table. Then we begin the <table> including a table header. Those are the constant parts of the email.

For the dynamic part of the table we add the activity using our function get_activity_list(). Before we call the wp_mail() function we close the email contents with </table></body></html>.

function send_user_activity_email()
{
    $subject = 'Oakbrooke User Activity';
    $to = $from = get_bloginfo('admin_email');

    $headers = 'MIME-Version: 1.0' . "\r\n" .
    'Content-Type: text/html; charset=ISO-8859-1' . "\r\n" .
    'From: ' . $from . "\r\n" .
    'Reply-To: ' . $from . "\r\n" .
    'X-Mailer: PHP/' . phpversion() . "\r\n";

    $email_content = '
        <!DOCTYPE html>
        <html>
        <head>
        <style>
        table {
            font-family: arial, sans-serif;
            border-collapse: collapse;
            width: 100%;
        }

        h2 {
            font-family: arial, sans-serif;
        }

        td, th {
            border: 1px solid #dddddd;
            text-align: left;
            padding: 8px;
        }

        .small-font {
            font-size: small;
        }

        .name-row {
            background: #eee;
            border-top: 1px solid #666;
            border-bottom: 1px solid #666;
        }

        tr:nth-child(even) {
            background-color: #dddddd;
        }
        </style>
        </head>
        <body>
        <h2>Oakbrooke Activity Log</h2>
        <table>
        <tr>
            <th>Name</th>
            <th>Activity</th>
            <th>Date/Time</th>
            <th>IP Address/GeoLocation</th>
        </tr>';

    $email_content .= get_activity_list();

    $email_content .= '
        </table>
        </body>
        </html>';

    if (EMAIL_TO_FILE == true) {
        $dir = WP_CONTENT_DIR . '/email.html';
        $tresult = (string) file_put_contents($dir, $email_content);
        test_log('Email to file on TESTSERVER result: ' . $tresult);
    } else {
        $result = wp_mail($to, $subject, $email_content, $headers);
        $tresult = $result ? 'TRUE' : 'FALSE';
        test_log($headers);
        test_log('wp_mail() was used on TESTSERVER! Result: ' . $tresult);
    }
}

To Cron or not to Cron

The activity summary should only go out once a day at a specific time. That’s sounds like something to do for a cron job.

WordPress has its own cron system for scheduling tasks. WP-Cron handles all WordPress cron jobs. While the name is borrowed from UNIX, WordPress cron doesn’t work the same way. WP-Cron works by checking on every page load a list of scheduled tasks to see what needs to be run. Any tasks due to run will be called during that page load. In other words, WordPress cron is executed when a page loads. This functionality did not meet my requirements and I decided to run a “real” cron job on the server. To do so we need a PHP file containing code to be executed by the cron job. In our case this file is called cron-job.php and the following shows its contents.

<?php
/**
 * the cron job is set up to run every 5 minutes on the server
 */

date_default_timezone_set("America/Chicago");

// set up WordPress environment
if (!defined('ABSPATH')) {
    require_once __DIR__ . '/../../../../wp-load.php';
}

// tell WordPress we are doing a cron task
define('DOING_CRON', true);

// send user activity every day @ 5:00 PM
if ((int) date('H') == 17 && (int) date('i') < 5) {
    require_once 'user-activity-email.php';
    send_user_activity_email();
}

We need to call the PHP function date_default_timezone_set() first if we are executing time based tasks during a cron job. Otherwise our clock will be off. In my case I’m in the central time zone so we use “America/Chicago”.

There are a few additional intricacies we need to pay attention to when doing server based cron jobs on a WordPress site. Reason being is that when the cron job executes the WordPress core environment is not loaded. However, we need the WordPress core functions to do our job. This why we have to require wp-load.php which is responsible for bootstrapping the WordPress environment which in turn enables the cron job to use the WordPress core functions.

Next we let WordPress know that we are doing a cron job. We define('DOING_CRON', true), a WP constant otherwise defined in wp-cron.php when WP-Cron is executing.

Lastly we call our send_user_activity_email() function. Our cron job runs every 5 minutes on the server because there are other things to do which are not listed in this post. The following if statement

if ((int) date('H') == 17 && (int) date('i') < 5)

ensures that send_user_activity_email() is only called at 5 P.M. aka 17:00 hours and only if minutes are less than 5. This way the email only goes out once and not 12 times during the hour.

cPanel-ing the Cron Job

Most web hosting companies use cPanel to let customers manage their back-office. Most cPanels contain all functionality needed to set up a cron job. If you are not familiar with cron here’s a link to a cPanel blog. If your host uses a different control panel the following may not apply.

A cron job definition to run every 5 minutes looks like this: */5 * * * * crontabguru offers a nice online calculator to make our lives easier. You may not need this if your cPanel has a dropdown selection for the timing. Sometimes they also have a selection of commonly used timings to select from.

To finish this we need to let the cron job know which file to open and which PHP version to use. The following string show how this looks in my case. Again, some of this may vary depending on your hosting company.

/usr/bin/php -q /home/username/public_html/wp-content/plugins/plugin_name/cron-job.php

The first path /usr/bin/php lets the cron job know where to find the PHP version. Some hosts require to name the explicit PHP version e.g. /usr/bin/php74 or something similar. The -q option tells the cron job to execute quietly. No logs are created. The final path lets the cron job know where to find our script on our server. This path may look different based on your host.

If you are writing a lot of code and you want to do versioning and keep a history you may want to take a look at my post about running SVN on a Synology NAS.

That’s it! I hope this helps to create your own activity log functionality or something completely unrelated. Questions and suggestions are always appreciated. Nobody is perfect!

Thoughts on Photography

What is missing in discussions about photography is the pursuit of a new way of thinking. We should focus on the aesthetic aspects of the medium. There is a new form of existence taking shape in our culture and society. The change from text based communication to a more image based culture, the linearity of two dimensional magic, within the change of a society from industrial to post industrial, from work to “play”, all this should be inside the frame of reference when we talk about photography.

I don’t really see a limit. At least not as a media of communication or form of art. Unfortunately, most photography I observe limits itself due to the lack of quality. There seems to be a trend in our culture to move away from quality towards a quick and disposable result. The fine art print seems to only exist in a museum setting. Even without formal training, most people are able to distinguish an image of poor quality from one of a nice quality. Being overwhelmed by a plethora of selfies and smartphone pics we are literally dumbed down by superficiality. I remember the days where we had an outcry about the new way of distributing music on CD’s and the quality lost compared to vinyl. Now mp3 and its siblings are THE thing, streaming music is what we do. But the audio quality of this music is really disappointing. That’s beside the point that there is a pile of low quality music produced as well. It almost appears that we don’t care anymore. But, to be fair, there are some exciting trends pointing the other direction, which is encouraging.

There is a lot of talk about technique and technology, gadgets and tools. However, a “technical” image is something produced by apparatuses. With the advent of digital the entry barrier into photography was dramatically lowered. Everybody has those apparatuses nowadays. Everybody takes pictures, but the desire to create good photographs is spread between few.

It’s important not to lose our visual literacy, the ability to decode visual symbols into meaning. Technical images are very difficult to decode. The non-symbolic, and perceived objectivity of technical images misleads the viewer to see them as a window into reality and not as a photograph, or a work of art.

Edward Steichen said “A portrait is not made in the camera but on either side of it.” When I talk about photography my thoughts mostly relate to portrait and editorial work because that’s what I do. This kind of work requires a connection between the photographer and the subject. In my mind the goal of photography is to convey a message, tell a story, make the viewer contemplate, stir emotions, evoke feelings, shock, dazzle, and raise or lower brows, to name a few.

Our culture is changing, we are highly adept to visual communications, mostly in advertisement but also in games. It’s getting harder and harder to achieve the goals because the gap is widening. To be successful as a photographer we need to have something that grabs our viewers attention, makes them stay with our work and contemplate, makes them want more of our imagery. Unfortunately, there is good content and then there is the rest. Some content will always grab attention of certain groups, i.e. if it’s provocative enough. Even a poorly executed duck face selfie will get attention if there is enough exposed skin. My photographic jungle consists of human objects ‘intentionally produced’. I think the intentional production, the thoughtful process to arrive at something that is trying to meet the goals mentioned above is what the overarching goal in photography should be.

Inside the world of digital photography the image is basically without value; it’s just an accumulation of bits and bytes on a memory chip. Nobody knows what that really is and why it should have any value. The photographer owns it, it’s copyrighted, but it only exists in cyberspace or the cloud until it’s made into something tangible. The fact that digital is so easily reproducible makes it worth even less. We all are observing this devaluation on a daily basis. The digital reproductions are always perfect copies and the multiplicity is overwhelming. Once there is a print the devaluation stops, at least to a certain extent. Digital images are being treated as pure information in an information society. They are almost treated with contempt.

There may be a sliver of hope because there are NFT’s or Non Fungible Tokens. Maybe if we as photographers learn how to take advantage of this new technology we’ll be able to stop the viscous circle of ruining ourselves.

Don’t forget to check out my epigram studio photography website!

Synology NAS & SVN

With DSM version 7 Synology decided to remove the SVN Server package from their distribution. Many developers, including myself, were caught by surprise. After upgrading to DSM V7.x, SVN just didn’t work anymore. It was gone! I have to admit that I didn’t pay attention to the release notes and I found out the hard way because my TurtoiseSVN client couldn’t connect to the repository anymore.

After evaluating my options I had to make a decision between downgrading my Synology NAS or running SVN inside of a Docker container. I didn’t want to downgrade so I decided for the Docker solution. I think Docker might come in handy later because there are a few things such as home automation that I’d like to try as well. If you’re interested in home automation, the image you’re looking for is Home Assistant. But I digress . . .

I need to mention that I have never worked with Docker or SVN Server before. I only used TurtoiseSVN for configuration management while the server was an easy to use DSM package. I had a bumpy ride!

Getting Docker

My decision to use Docker created another challenge because my DS416play DSM does not include the Docker package. Fortunately there is a manual install option in the Package Center. I downloaded the Docker package from the Synology archive at

and then used the manual install option of the Package Center. By the way, the latest Docker version may not work with your DSM version. If that’s the case you’ll see an error message during install and you have to go back and pick an earlier version from the archive.

Getting an SVN Server Image

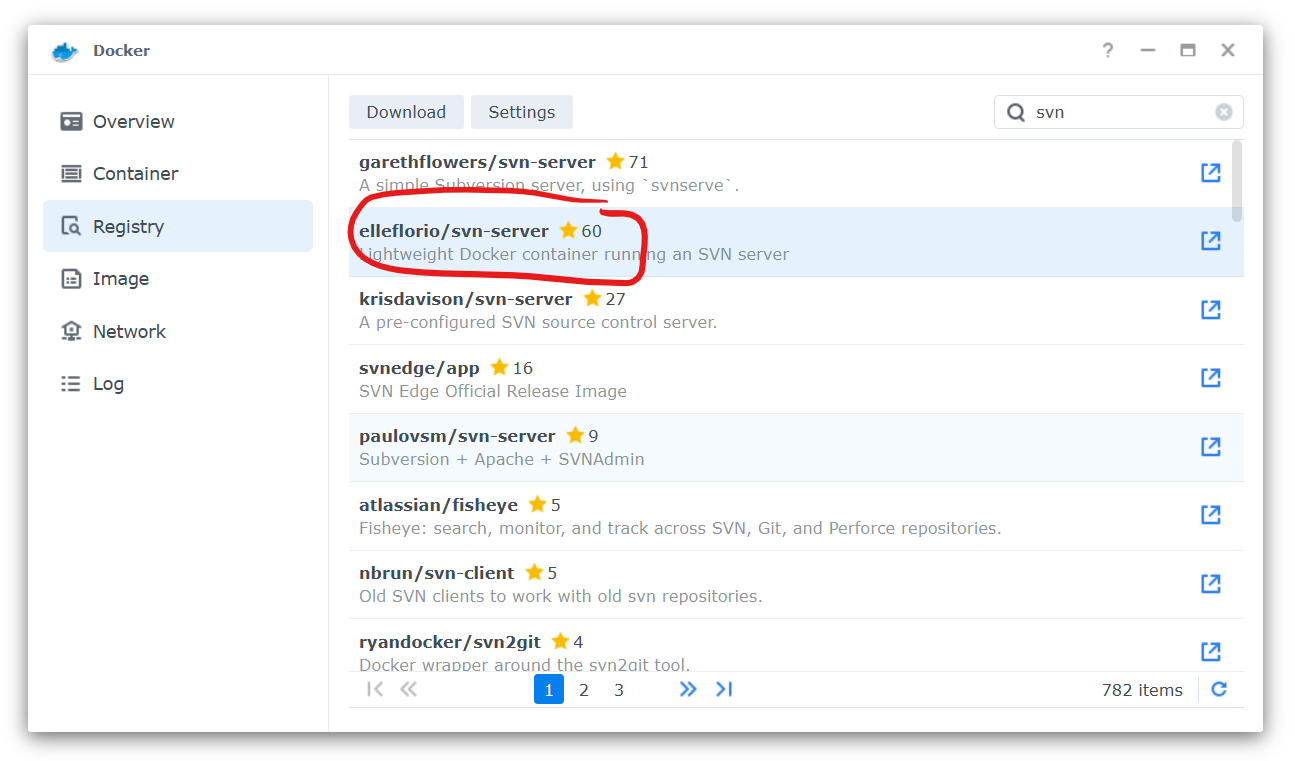
Next we need an SVN Server image to run inside our Docker container. There are several SVN images available at the Docker Hub. Looking at what’s available I opted for the elleflorio/svn-server. You can find an image through the Docker Registry tab by typing svn into the search box, select which image you want, and then chose Download.

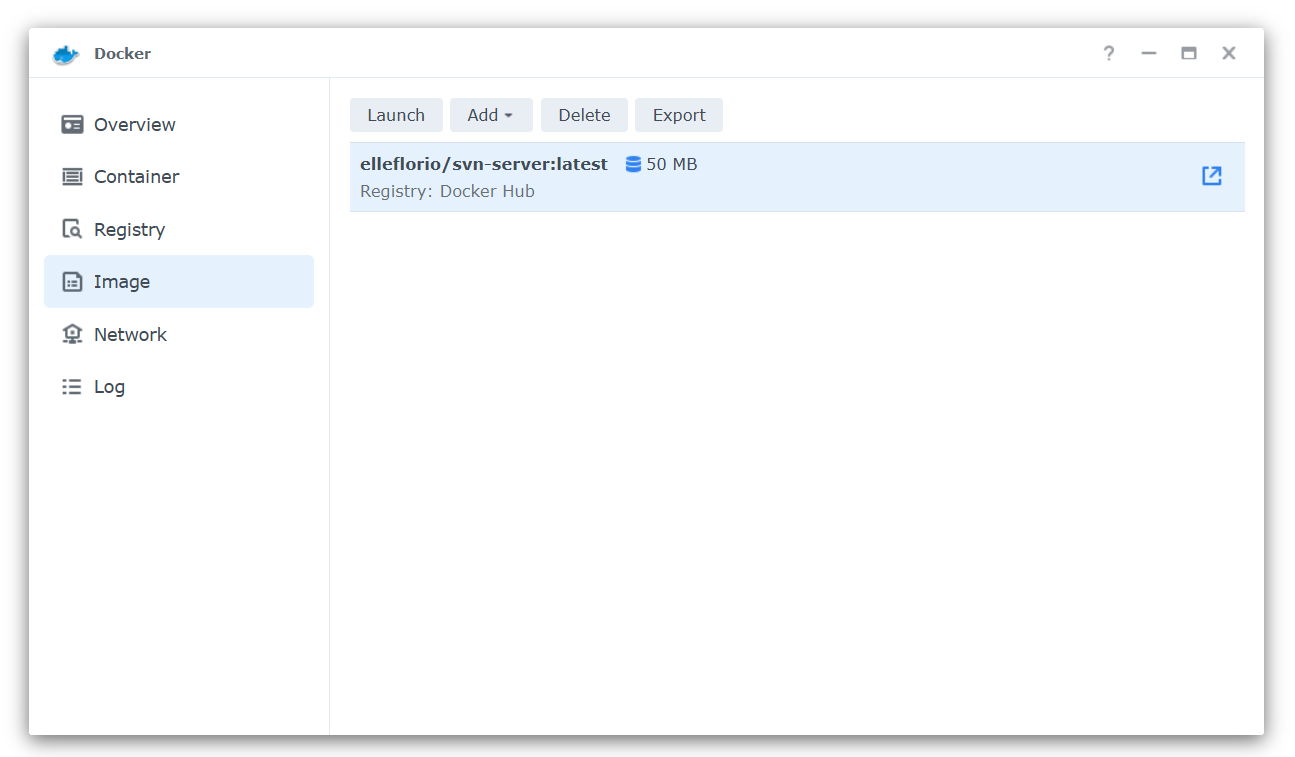
Once the package is downloaded the image is available on the Docker Image tab.

Creating a Docker Container

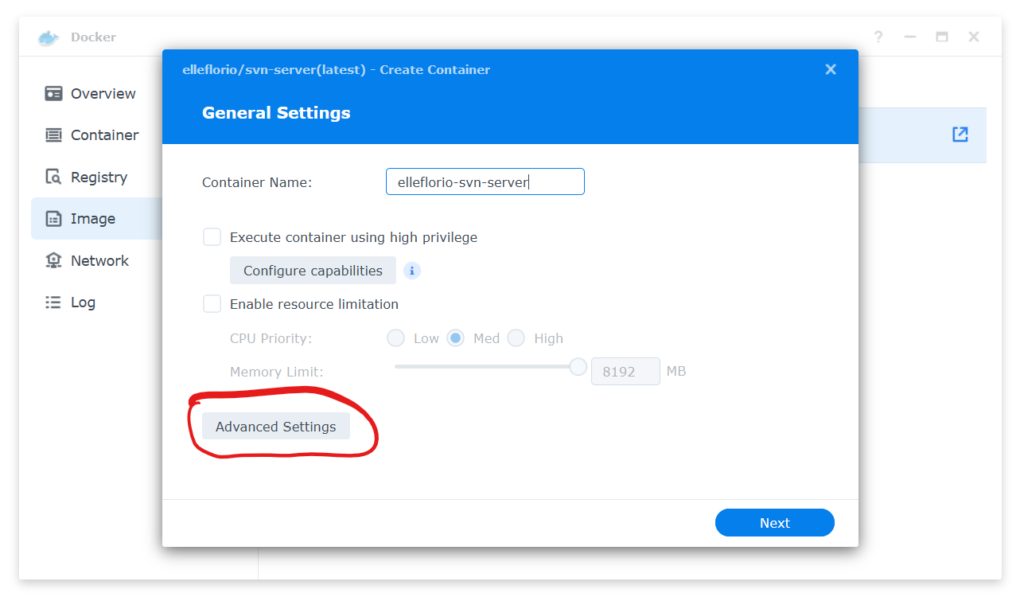
It’s time to create a Docker Container and launch the image. After clicking the Launch button we’ll get to the container settings. By the way, you can execute all these steps from a command line interface using PowerShell or PuTTY and SSH. All the CLI commands you need are listed at the Docker Hub page. But I’m lazy so I take the “easy way”. Click on Advanced Settings.

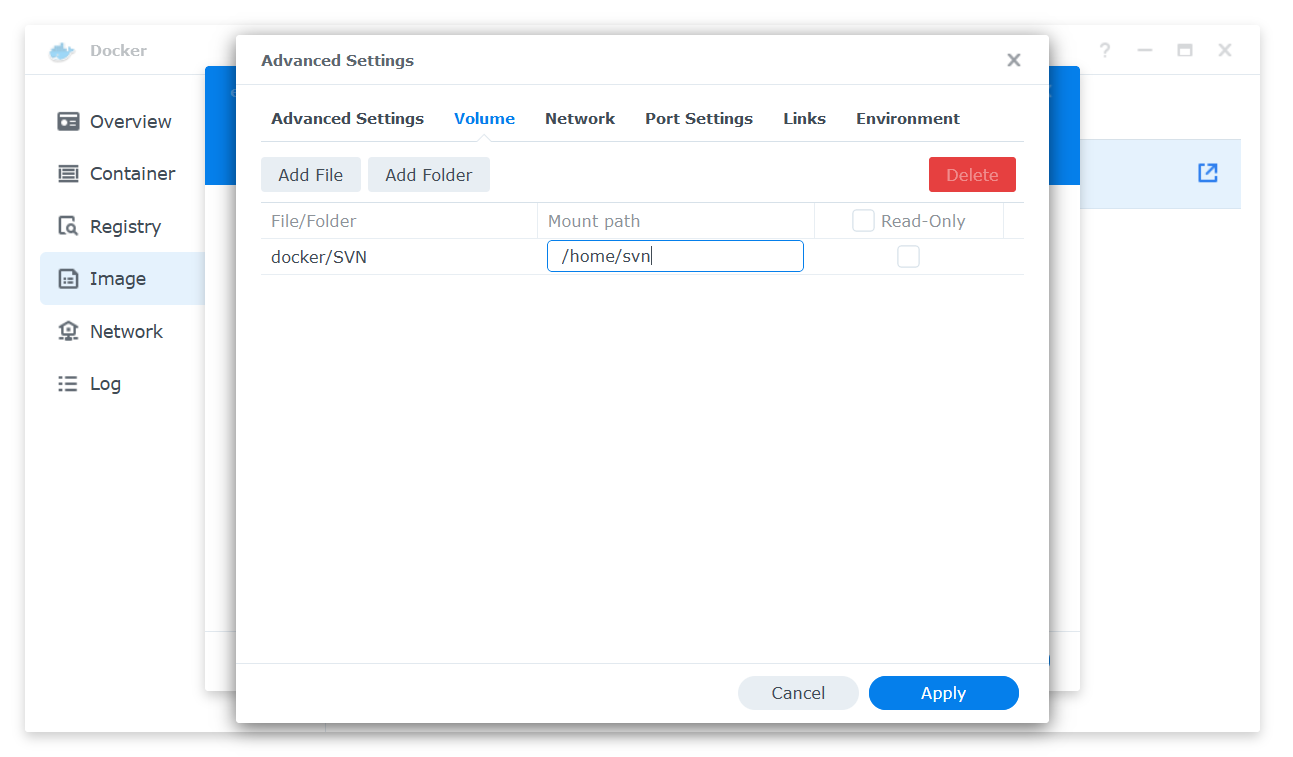
There’s one very important step in this process and that is to mount a Volume which is being used to store the repositories. Docker creates a share during install called “Docker”. Since I plan to have more than one container, each with a different purpose, I created a folder named SVN inside the Docker share for use by the SVN Server. We use this folder in the next step.

This folder needs to be mounted at /home/svn which is the default path from the SVN image. Other SVN images may use different paths. It is important to mount a volume outside of the container if you want to easily backup your repositories or access the repositories directly via file system. This comes in handy later when we have to configure access rights for the SVN repositories. Also make sure that “Read-Only” is NOT checked.

In this scenario the ports for accessing SVN Server are set automatically by the Docker configuration tool. If you want to map your own ports you’d want to change the values on the Port Settings tab. If you chose to keep the automatic setting the actual port settings can be found on the Docker Container tab under Details. Keep in mind that if you restart the container or reboot your NAS the ports may change!

Creating a Repository

From here on we need to use an SSH CLI to access the Docker container on the NAS. I use PuTTY but Windows PowerShell etc. work as well. First we want to test the SVN server and see if it’s running. To do so we need to create a SVN server username & password.

docker exec -t <your-server-name> htpasswd \
            -b /etc/subversion/passwd <username> <password>

This will allow us to check the SVN repository via browser http[s]://<your-nas-ip>:<your-port>/svn

If it’s working it will show an empty repository. Sometimes you’ll see a @eaDir directory. That’s something the NAS creates and it can be deleted. Next step, we need to create a repository. Since svnadmin is included in the image we can use the create subcommand:

docker exec -it svn-server \
       svnadmin create /home/svn/<repository_name>

Make sure you use the /home/svn/ path in front of the repository name. This will create the repository at the mounted file system not inside the container. If we check the repository again at http[s]://<your-nas-ip>:<your-port>/svn it will show a repository with your <repository_name>. You can also go to the Docker share and find everything there. Unless you’re very familiar with SVN Server, do not change what’s in the repository folder. It may corrupt your repository.

Configuring the SVN Server

The last step is to edit the SVN configuration files. Each repository has its own configuration files. The files are located at docker/<repository_name>/conf/.

First we edit the svnserve.conf file.

[general]
anon-access = none
auth-access = write
password-db = passwd
authz-db = authz

This basically says

  • anonymous users have no access
  • authorized users have write rights
  • the password file name is “passwd”
  • the authorization file name is “authz”

Additional details about the SVN configuration can be found at the Apache Subversion web site.

Next we have to add user[s] to the passwd file.

[users]
user_joe = user_joe_password

Each line is a user = password combination. Lastly edit the authz file.

[groups]
allaccess = user_name

[/]
@allaccess = rw

This creates an allaccess group and gives the user user_name access to all repositories from the repository root down. Again, more detail about this configuration can be found at the Apache Subversion web site.

This should be it to get your Docker SVN Server going. On first access with TurtoiseSVN or else it will ask you for your username/password. After that it’ll be a smooth ride.

N360 | Splash Screen

I recently finished development of a WordPress plugin and published it at WordPress.org. It’s a landing page or splash screen for any wordpress blog or website called

N360 | Splash Screen

After a detailed code review by the WordPress team and a few revisions on my end, it was approved and it’s now available at the WordPress plugin repository. If you want to take a peek and see how it works, here is a link to my demo page.

If you’re running a WordPress website and you are brave enough to give the initial release a try you can install it directly from your WordPress admin plugin page. Search for N360 and it will pop up. Or you can download it from the WordPress repository and manually install it.

Enjoy! It’s free!

Welcome to notion 360!

I created this blog as a home for my design activities and a place where I can post my ramblings outside of the Facebook echo chamber. Not sure where this is going but right now I’m enjoying it! And off we go …

A quote from Robert M. Pirsig’s book “Zen and the Art of Motorcycle Maintenance” came to mind when I started working on this page:

This divorce of art from technology is completely unnatural. It’s just that it’s gone on so long you have to be an archaeologist to find out where the two separated. Rotisserie assembly is actually a long-lost branch of sculpture, so divorced from its roots by centuries of intellectual wrong turns that just to associate the two sounds ludicrous.

Robert M. Pirsig

I’ve had lengthy discussions about this topic with one of my professors while studying Electrical Engineering and Computer Science at my alma mater. In my mind there is beauty in mathematical formulas and in printed circuit boards. But my professor thought that Systems Theory and Electrical Engineering have nothing to do with art. Nevertheless I’m not alone. Steve Jobs once had an argument with one of his engineers about a printed circuit board for an early Apple prototype.

I fully understand where he was coming from.

Steve started critiquing the layout on a purely esthetic basis. “That part’s really pretty”, he proclaimed. “But look at the memory chips. That’s ugly. The lines are too close together”.
George Crow, our recently hired analog engineer, interrupted Steve. “Who cares what the PC board looks like? The only thing that’s important is how well that it works. Nobody is going to see the PC board.”
Steve responded strongly. “I’m gonna see it! I want it to be as beautiful as possible, even if it’s inside the box. A great carpenter isn’t going to use lousy wood for the back of a cabinet, even though nobody’s going to see it.”

Andy Hertzfeld

Simplicity is the ultimate sophistication, a statement by Leonardo DaVinci which is not specifically about art or engineering, has its value in both disciplines. I used his Vetruvian Man as the cover image for this post because he truly was the incarnation of an artist, designer, and engineer.

It may be that the left brain – right brain association is the reason for the artificial separation of art and engineering. And only if both sides of the brain are equally developed art and engineering can live in harmony.

I’ll keep pondering these ideas to see where it gets me. I’ll probably share more of those ramblings here.